
Are you tired of the hassle of rebooting your PC and navigating through the BIOS settings just to adjust your CPU fan speed? Whether it’s the distracting noise of a CPU fan running too fast or the concern of overheating, finding the right balance can be a chore. But what if there was a simpler, more efficient way?
Well, allow me to introduce you to Fan Control, a user-friendly tool that lets you customize your CPU fan speeds with just a few clicks, all without ever touching the BIOS again.
What is Fan Control Software?

Fan Control is software designed to give users a simpler way to manage their computer’s cooling system. This tool was developed by Rémi Mercier, a PC enthusiast who saw the need for a more accessible approach than the traditional BIOS settings.
With Fan Control, you can easily adjust the speed of your PC fans, including your CPU fan.
The software is user-friendly, making it ideal for those who are not comfortable navigating BIOS or for anyone looking for a quick and efficient way to control their PC’s temperature.
How to Download Fan Control?
Now that you know what Fan Control software is and how it can help you adjust your CPU fan speed, let’s download it and see how it works. Here are the steps to do that:
- Go to the official website of Fan Control software at https://www.getfancontrol.com/
- Click on the Download button
- Extract the file to your desired folder
- Start FanControl.exe
PS: You don’t need to install anything!
Now you are all set to use Fan Control to control your CPU fan speed without the need to head over BIOS.
How to Control Your CPU Fan Speed Using Fan Control
Identifying Your CPU Fan
Once you launch Fan Control, it will start detecting all the fans on your PC, including the GPU and CPU fans. Our focus will be on the CPU fan, but first, we need to identify which fan is the CPU fan among the ones labeled as “Fan # number”.
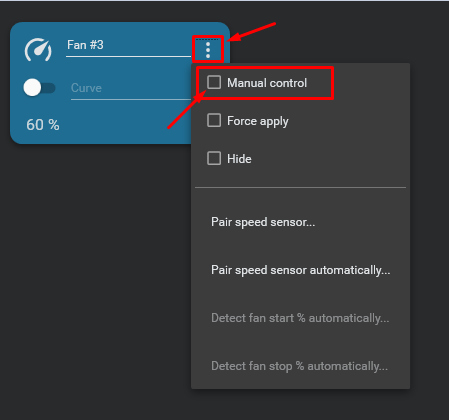
There are a few ways to do this: The first method is by increasing or decreasing the speed of each fan and seeing in your PC case which one was affected. To do so, press on the three dots on each fan box and select Manual Control, then either increase or decrease fan speed.
Or you can do it the same way I did which is by increasing the fan speed on Fan Control and looking at HWMonitor on the CPU fan RPM section to see whether the speed has increased or not (They need to have the same RPM).
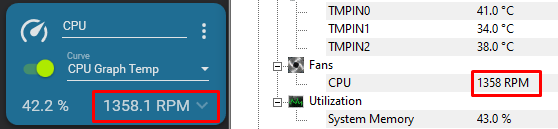
If it was affected, then you got your CPU fan, if not, you didn’t.
Customizing Your CPU Fan
Once you’ve identified your CPU fan, please uncheck ‘Manual Control’ and enable the ‘Curve’ option. You also can name it to anything you want.

To start customizing your CPU fan, click on the green ‘+’ icon located at the bottom right of the Fan Control interface. This will display several options, such as Graph, Trigger, Mix, etc. For this example, I’ll choose the ‘Graph’ option to create a custom fan curve for my CPU.

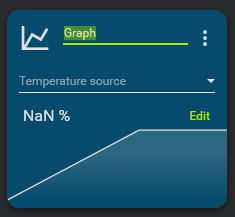
Once you click on the Graph option, you will notice a box appearing on the bottom of Fan Control interface.
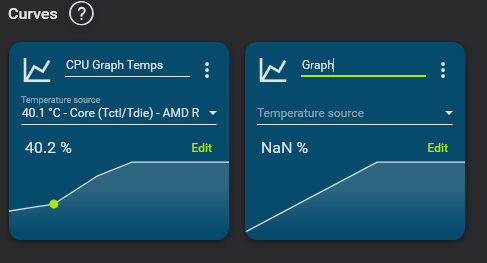
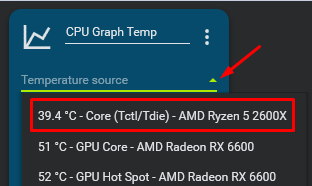
First, rename Graph to something like CPU Graph Temp.
Then, click on Temperature Source to select your CPU source (it will include your CPU name).
After selecting your temperature source, click on “Edit” to start customizing the fan curve. You can adjust the curve by adding or removing green dots representing thresholds. To add a new one, left-click on the graph. To remove, right-click on a green dot.
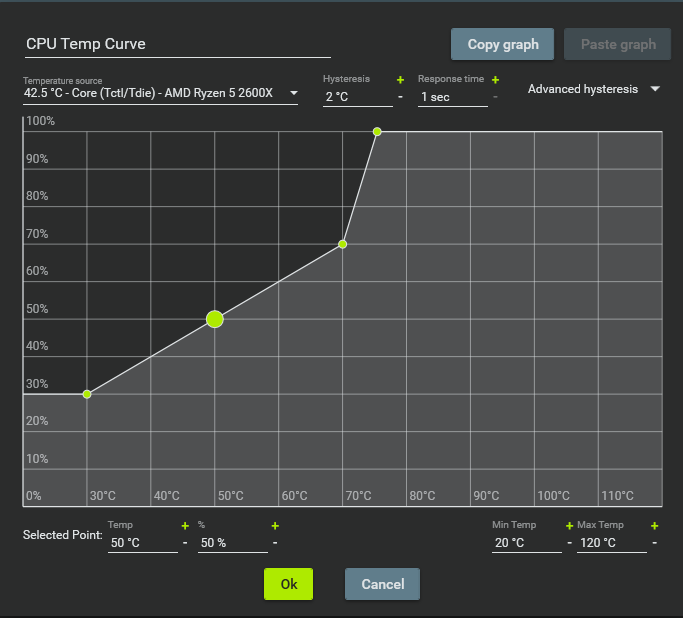
After that, drag the dots to adjust the fan speed and the temperature as you wish. Once you’re done, press OK.
Then, go to your CPU fan box’s Curve option and choose the profile you created. The fan speed will change according to your chosen profile.

PS: You can do the same thing with the rest of your case fans. In other words, you can create a profile, select a temperature source (your CPU or any other source), customize the graph as you want, and then add that profile to the curve of your selected fan so it can increase or decrease the speed based on the temperature’s source.
Precaution Measures When Using Fan Control Software

Fan Control software gives you the flexibility of customizing your fan speed as you wish, but it also comes with some risks that you need to be aware of and avoid.
For example, if you set the fan speed too low just to get a quiet system, you may cause overheating issues if your fan isn’t capable of performing well at low RPM. Overheating can damage your CPU and other components, reduce their lifespan, and affect their performance.
Therefore, you should always check your temperatures and adjust the curve accordingly. You can use HWMonitor or any other program that monitors the temperature and performance of your CPU and other components.
Lastly, don’t forget to check your CPU’s safe temperature on the manufacturer’s website to avoid exceeding the maximum temperature limit for your CPU.
Conclusion
We hope this article helped you learn how to use Fan Control software for managing your CPU fan speed without accessing BIOS.
Your experiences and questions are important to us. Please drop a comment sharing how the tool worked for you or if you have any remaining queries.
We're an affiliate
We hope you love the products we recommend! Just so you know, gameraround.com is a participant in the Amazon Services LLC Associates Program, an affiliate advertising program designed to provide a means for sites to earn advertising fees by linking to Amazon.com.