
Most of us are familiar with the drill of tapping the Delete button to jump into the BIOS. But what if you’re using a 60% keyboard? Don’t worry, I’m here to walk you through three simple methods that’ll get you there in no time.
Ready to explore these solutions? Let’s dive in!
Method 1: Fn + Backspace

For those using a Ducky One 2 Mini or similar 60% keyboard, accessing the BIOS can be achieved through a simple key combination, just like you’d do it when taking a screenshot. Here’s a simple guide to using the Fn + Backspace method:
- Restart Your Computer: You can start this process by either restarting your computer or from a powered-off state.
- Press and Hold the Fn Key: As your computer starts up, hold down the ‘Fn’ key on your keyboard.
- Continuously Press Backspace: While holding the ‘Fn’ key, repeatedly press the ‘Backspace’ key. This is similar to how we used to access the BIOS with the ‘Del’ key on traditional keyboards.
- Enter BIOS Setup: Keep pressing until the BIOS menu appears. Once you see it, you have successfully accessed the BIOS.
If this method doesn’t take you to the BIOS, don’t worry. The next section covers a more universal approach that should work for everyone. Let’s move on to explore that method.
Method 2: Restarting PC with Shift Button
If the Fn + Backspace method didn’t work for you, there’s another reliable method you can try. This involves using the Windows operating system’s built-in options to restart your PC directly into the BIOS.
This method is especially useful as it bypasses the need for specific keyboard shortcuts and works universally across different types of keyboards and PCs. Here’s how it works:
1. Initiate a Restart: Begin by restarting your computer. You can do this through the Windows Start menu.
2. Hold the Shift Key: As your computer starts to restart, hold down the ‘Shift’ key. Keep holding it until the Windows recovery menu appears. This is a key step as it directs Windows to enter the advanced startup environment instead of booting up normally.
3. Navigate to Troubleshoot: Once in the recovery menu, click on the ‘Troubleshoot’ option.

4. Go to Advanced Options: In the Troubleshoot menu, select ‘Advanced Options’. Here, you will find various tools for system recovery and diagnostics.

5. Select UEFI Firmware Settings: Look for an option labeled ‘UEFI Firmware Settings’.

6. Restart Your PC: After selecting ‘UEFI Firmware Settings’, there will be an option to ‘Restart’ your PC. Click on this to restart your computer.

7. Enter BIOS Setup: Upon restarting, your PC should automatically enter the BIOS setup utility. This is where you can make the desired changes to your system settings.
And voila! Once your PC restarts, you should find yourself in the BIOS. This method is quite straightforward as it doesn’t involve specific keyboard shortcuts, making it a versatile option for any PC user.
Method 3: Accessing the BIOS from Windows
If Method 2 didn’t work for you for any reason, don’t worry. Here’s another straightforward method to access the BIOS, similar in process but using a different approach.
This method takes advantage of the Windows built-in settings, providing an easy and intuitive way to restart your computer directly into the BIOS.
Let’s walk through the steps:
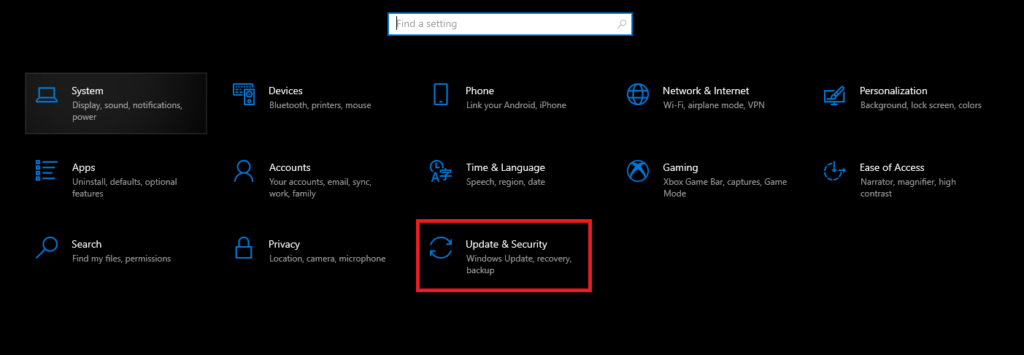
1. Open Settings: Click on the Start menu and select the gear icon to access Windows Settings.

2. Navigate to Update & Security: In the Settings window, go to ‘Update & Security’. This section handles various aspects of your system’s health and security.
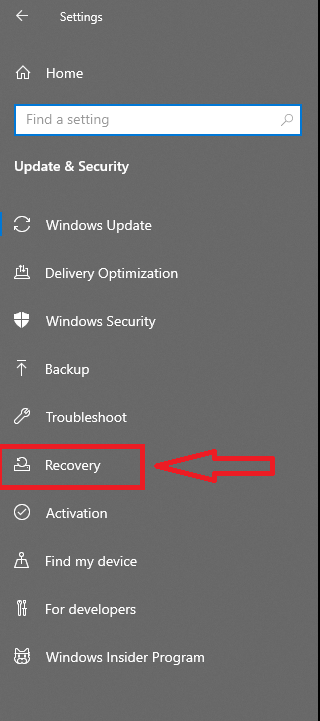
3. Select Recovery: From the options on the left, choose ‘Recovery’. This brings up settings related to system recovery and advanced startup.
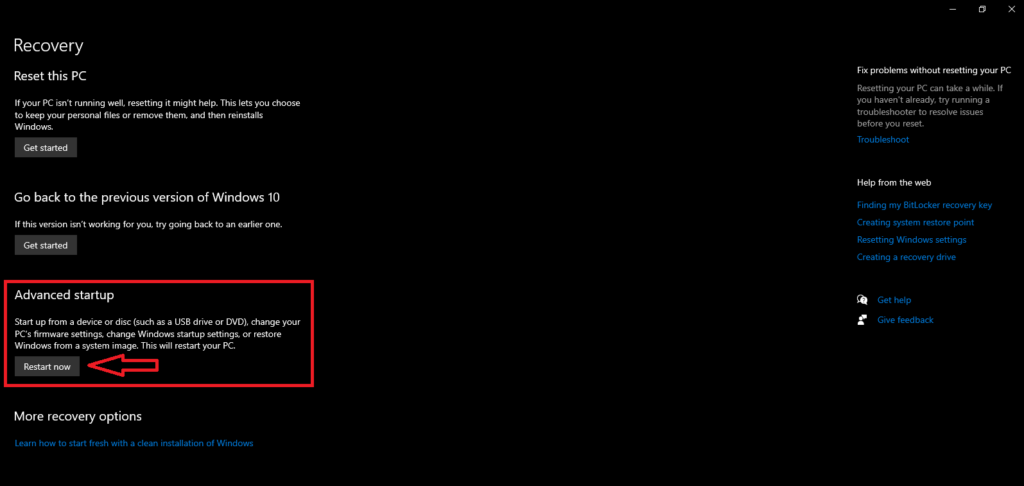
4. Initiate Advanced Startup: Under ‘Advanced startup’, click the ‘Restart now’ button. Your computer will reboot to a special menu, providing additional startup options.
5. Choose Troubleshoot: Once your PC restarts to the options menu you will have to follow the same steps we discussed in Method 2. In other words, select ‘Troubleshoot’.
6. Go to Advanced Options: In the Troubleshoot menu, click on ‘Advanced options’, taking you a step closer to your BIOS settings.
7. Select UEFI Firmware Settings: Find and select ‘UEFI Firmware Settings’, followed by clicking the ‘Restart’ button. This action will command your computer to reboot into the BIOS.
This method is just as simple as Method 2 but uses the Windows interface for those who prefer or require a more guided approach.
Conclusion
And there you have it – three easy methods to access the BIOS with a 60% keyboard. We hope this guide has made the process clearer and more manageable for you. If you wish to learn more about how to properly use your 60% keyboard, you can read our article on how to use arrow keys on this type of keyboard.
Now, we’d love to hear from you! Which method worked best for your setup? And, just as importantly, what 60% keyboard are you using?
Sharing your experience not only helps us tailor our advice better, but it also aids fellow enthusiasts in their tech journeys.
We're an affiliate
We hope you love the products we recommend! Just so you know, gameraround.com is a participant in the Amazon Services LLC Associates Program, an affiliate advertising program designed to provide a means for sites to earn advertising fees by linking to Amazon.com.