
Did you know your keyboard can do a magic trick? It can turn on your PC! No more reaching for the power button when you’re cozy in your chair.
With a simple tap on the keyboard, your computer can wake up ready for action. This isn’t just a cool shortcut; it’s a super-smart way to jump into your games or homework faster.
Let’s learn the easy steps on how to turn on a PC with a keyboard and make your friends say “Wow!”
Accessing the BIOS Setup
Accessing the BIOS with the Boot Key

To enable your keyboard to turn on your PC, you’ll first need to access the BIOS setup. Here’s how to get started:
- Start your PC: Begin by turning on or restarting your computer.
- Watch for the prompt: As the PC starts, look for a message that says something like “Press [Key] to enter setup” or “Press [Key] for BIOS.”
- Press the key: Tap the key mentioned in the message (often ‘Delete’, ‘F2’, ‘F10’, ‘F12’, or ‘Esc’) several times until the BIOS screen appears.
Accessing the BIOS from Windows
If you’re already in Windows and want to go to the BIOS without restarting and using the boot key, you can use the advanced start-up options. (For 60% keyboard owners, please check out this article to learn how to access BIOS.)
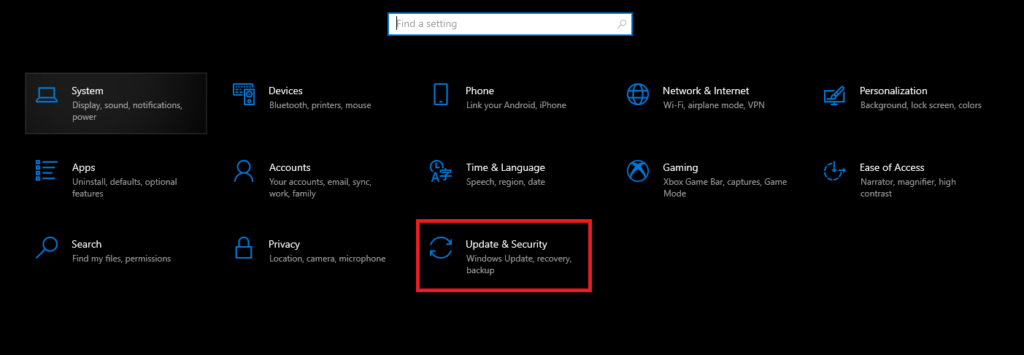
Open Settings: Click on the Start menu and select the gear icon to open Settings.
Update & Security: In the Settings window, choose ‘Update & Security’.
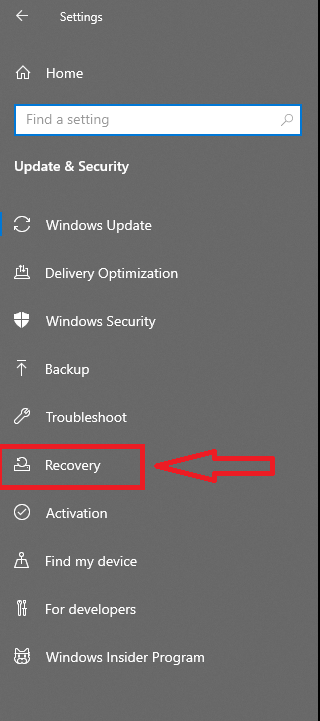
Recovery: From the sidebar, select ‘Recovery’.
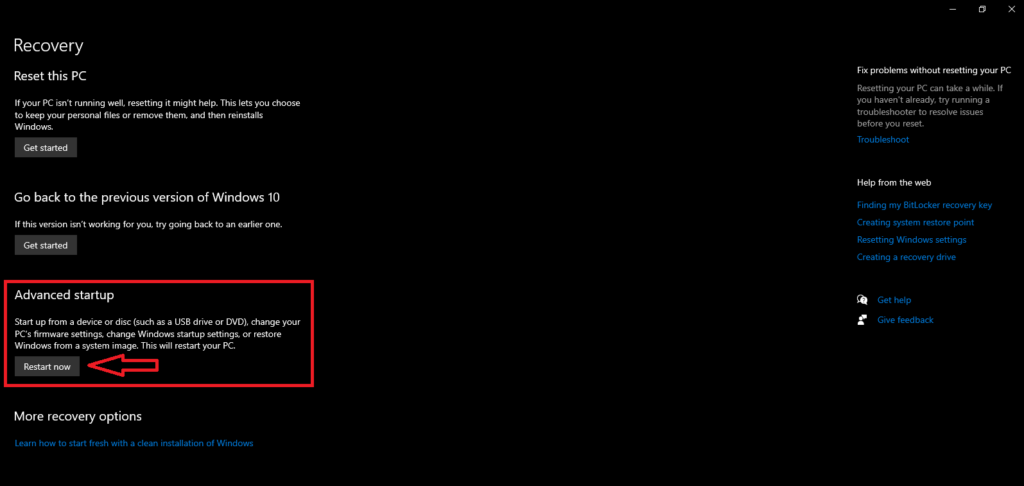
Advanced startup: Under the ‘Advanced startup’ section, click on ‘Restart now’. Your computer will reboot to an options menu.
Troubleshoot: On the options menu, choose ‘Troubleshoot’.
Advanced options: Then, select ‘Advanced options’.
UEFI Firmware Settings: Finally, click on ‘UEFI Firmware Settings’ and then the ‘Restart’ button. Your computer will reboot into the BIOS.
This method uses the built-in Windows interface to restart your computer directly into the BIOS settings, bypassing the need for the quick timing normally required to press the BIOS key during boot-up.
Configuring BIOS for Keyboard Power On and USB Wake-Up
Power On By Keyboard
Within the Power Management section of the BIOS, locate the ‘Power On By Keyboard’ or ‘Keyboard Power On’ settings. Select this feature and enable it.
This will allow your computer to start up when you press a key on your keyboard, giving you a quick and easy way to power on your PC without reaching for the power button.
USB Wake Up from S3
Still in the Power Management menu, find the ‘USB Wake Up from S3‘ option. S3 is a sleep state that conserves energy while keeping the computer in a ready-to-wake state. Enabling this setting allows your USB-connected keyboard to wake the PC from this low-power state.
Disabling ERP Mode
Lastly, it’s important to address the ‘ERP Mode’ setting. ERP stands for Energy-Related Products, and this mode is designed to reduce your computer’s power consumption when it’s turned off or in sleep mode. However, enabling ERP Mode prevents the keyboard from turning on the PC.
To ensure that your keyboard can turn on your computer, you’ll need to disable ERP Mode. This will allow the necessary power to be supplied to USB ports, so the keyboard wake-up function can work properly.
PS: Some people have reported that after disabling ERP, their keyboard’s RGB lights stay on even when the PC is turned off.
Testing Your Setup

Now for the fun part: testing it out! Once your computer is off, press the key on your keyboard that you set up for this feature. If everything is set up correctly, your computer will spring to life just from that keypress.
Conclusion
And that’s it! You’ve now set up your PC to turn on with your keyboard. It’s a neat trick that can save you time and make you feel like a computer pro.
Remember, if it doesn’t work the first time, don’t worry. Just go back into the BIOS and double-check your settings.
We're an affiliate
We hope you love the products we recommend! Just so you know, gameraround.com is a participant in the Amazon Services LLC Associates Program, an affiliate advertising program designed to provide a means for sites to earn advertising fees by linking to Amazon.com.